Skin tones can be one of the more difficult aspects of a photograph to master. Getting pleasing skin tones will make your image appear more eye-catching and attractive. If you know the right steps to take, skin can be pretty simple to master. Using these three simple tricks, using only Adobe Camera Raw (ACR), your skin tones will appear more balanced and pleasing to the eye.


Note: working in Lightroom you can do the this as well, because the sliders and options are the same!
White Balance
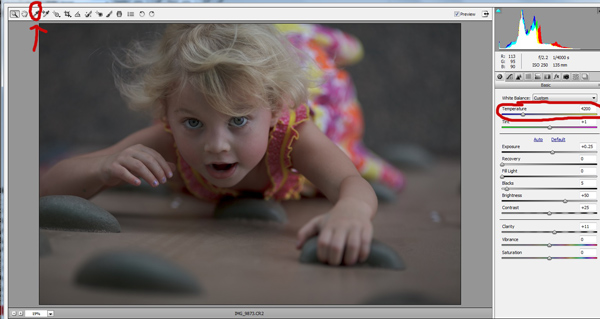
When trying to get great looking skin tones, the first thing you should pay attention to is the white balance. Correct white balance will set the stage for great skin tones. If the white balance is too cool, your skin will appear gray or bluish. On the other hand, if the white balance is too warm, the skin will look yellow or orange. Neither of these options are very pleasing to the eye, and make the skin more difficult to work with later on.
To see if your white balance is accurate, use the white balance targeted adjustment tool. It looks like an eye-dropper and is located at the top of the screen. It is the third tool over from the left. Click on the dropper, then click on an area of your photo that is white. The whites of the eyes are a good place to start. This should give you a good indication of where the white balance should be set. If your image still appears too warm or cool to your taste, use the temperature slider located to the right of your screen, it is the first one. Adjust this by sliding it to the right or left until your get a pleasing white balance. You may have to adjust Tint as well.

Exposure
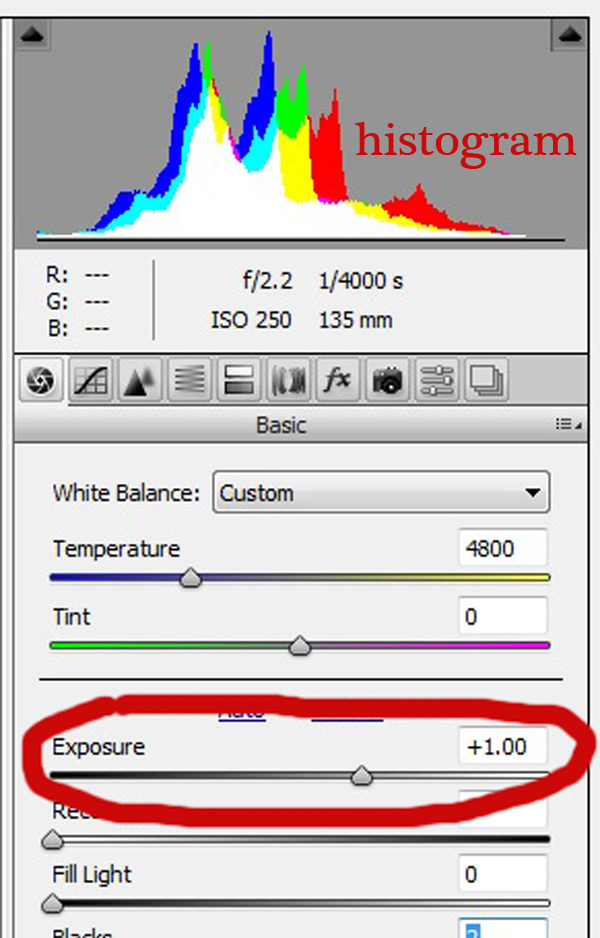
Next, make sure your exposure is correct. Take a look at the histogram located in the upper right hand corner of the screen. Ideally, you want it to look like a smooth bell curve, with the high point of the curve right in the middle. Check to make sure that the curve does not go too far to the left or the right. This may indicate that your photo is over or underexposed, causing your skin tones to either be gray and dark, or too bright and blown-out in some spots.

If your curve does fall too far to one side, use the exposure slider to fix it. Located three sliders down on the right hand side of your screen, move it either left or right. Watch your histogram. When the majority of the curve is in the middle, you've got it! In some photos, there will be parts of your image that are very bright or dark, and cause your histogram to spike on parts of the curve. This happens often when you have a bright sky in the background. If this is the case, your curve will be off the chart on the right edge of the histogram. In an image like this, you would look at where the majority of your curve lies and ignore the parts of the curve that are out of range.
For more information see: How to Read and Use Histograms
Luminance
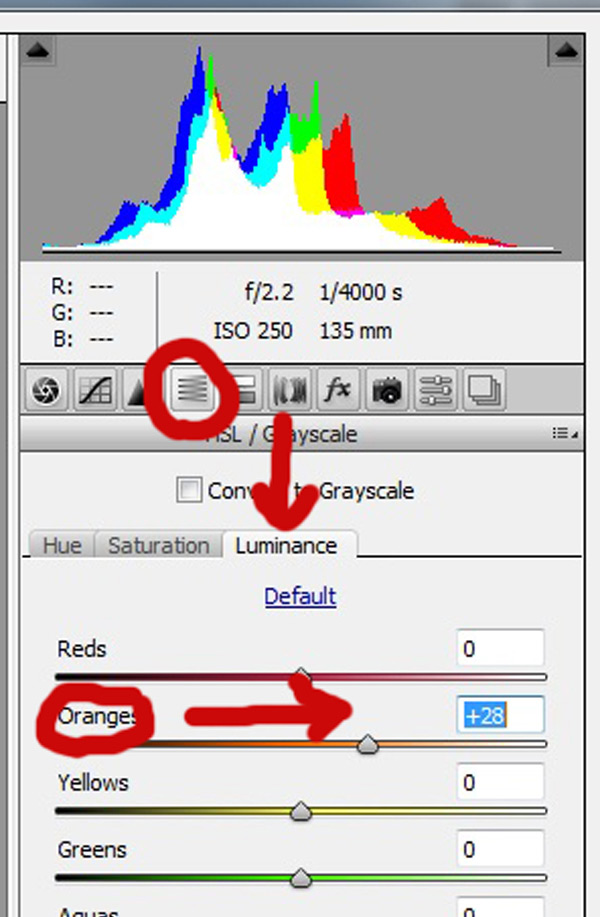
Finally, to give your skin tones just a little more brightness you will want to locate the luminance sliders (look for the HSL panel, the L stands for Luminance). You will see a horizontal strip of buttons directly under the histogram on the right panel. The fourth one to the left is HSL/Grayscale, click on that button. After selecting that option, three tabs will appear. Click on the Luminance tab. Choose the orange slider, which is two down, and move it to the right. You will notice that this affects mainly the skin in your photo and leaves the other areas of the image untouched. The more you move it to the right, the brighter the skin will appear. Keep moving the orange slider back and forth until the skin is the brightness you prefer.


Once you have adjusted your RAW image using these three steps, you can open it up in Photoshop to do any fine tuning or adjustments on the remainder of your photo. Your skin tones, however, should already look great and need little, if any additional work.


Do you have any other tips for making great looking skin tones using ACR? Please share them in the comments below.
The post 3 Tips for Getting Great Skin Tones Using Adobe Camera Raw by Emily Supiot appeared first on Digital Photography School.
No comments:
Post a Comment